

From Idea to Image, Part Four
One Face in Many Images
By Claude, edited by Owrang
About this series
From Idea to Image is a weekly self-study course in making images with AI. The text of the series is also written with the help of AI and is edited and published by Owrang.
Each part teaches one skill and ends with a simple exercise you can do the same day. The images on this page were made with the same description and the same scenes you will read below.
Put last week's four images side by side once more. You gave each one a word for its feeling, and if the exercise went well, the four words were different. Now look at them with another question. Is it the same woman in all four? In ours it was not. For the fourth image we asked twice for the same woman, and twice a different woman sat down at the table. If the woman changed in your images too, you made no mistake. You reached the limit that this week is about.
One image can stand alone. But a story, a children's book, a set of posters for one event or a family album that never existed needs a person who can walk from image to image and stay herself. This week we learn how to help the machine hold on to one face. Our method rests on three things, words, an image and visual markers, and none of them depends on a particular tool.
Why the face changes
When you write "a woman in her sixties", you have not described a person. You have described millions of people. Unless you give the machine a reference, it has to build the face from scratch every time. Every image is made anew from the words you give it, and wherever the words leave a choice open, the machine chooses again. Last week almost everything was open. We gave her age and nothing else.
A novelist has the same problem and solves it the same way. A character who is only "a woman in her sixties" has no face for the reader either. The face appears when the writer gives her a narrow face, a white streak in her hair and glasses she keeps pushing up her nose.
Words: the character description
Write a short description of your person and treat it as fixed. Five to seven visible features are enough, the same number we used for a scene in Part Two. Go from the general to the particular. Age. The shape of the face. The hair, its color and how it is worn. Eyes and eyebrows. One mark that belongs only to this person, a white streak, a mole, a gap between the front teeth. Then the clothes.
Leave out the words that cannot be seen. Kind, dignified and tired are feelings, and as we saw in Part Two, the machine has to guess what they look like, and it guesses differently each time. Leave out the word beautiful as well. It often pulls a face toward the same smooth, unmarked average.
Once the description is written, do not rephrase it. Copy it word for word into every prompt. "Gray hair gathered at the back" and "silver hair tied up" are the same to us, but to the machine they are two separate instructions.
Image: the reference image
Words narrow the choice, but they do not close it. Many faces fit even the most careful description. So before you make any scene, make one plain portrait of your person and call it the reference image. From then on, that is who she is.
A good reference image is an uneventful one. The face is turned to the camera, the light is soft and even, the background is plain, the face is calm, and nothing covers it. Any strong effect in the reference image usually travels with the face into the images that follow.
Many tools let you give an image along with your words, or continue working in the same conversation where the image was made. Wherever one of these is possible, use it, and say plainly what you want from that image. "The same woman as in this image." Where neither is possible, the description has to carry all the weight, and you should expect a sister who resembles her, not the woman herself.
Visual markers: what she wears and carries
Think about how we recognize a character in a comic strip or an old film. Often it is not the face at all. It is the hat, the coat, the mustache, the cut of the hair. A viewer who sees the same round glasses, the same green cardigan and the same white streak accepts small differences in the face and does not even notice them.
So give your person two or three fixed markers and keep them in every image, even where the scene would allow a change. Later, when the face holds well, you can change her clothes. For now, the cardigan is part of her face.
This week, step by step
We take the woman from last week's kitchen, and this time we make her one person. The description stays untouched in every step, and only the scene changes.
Step 1. Write the character description. Ours is this. "A woman in her sixties with a narrow face, high cheekbones and dark eyes under thick eyebrows. Her gray hair is gathered in a low bun, with one white streak at the front. She wears round metal glasses, a dark green cardigan over a cream blouse and a thin gold chain." From here on, every prompt in this lesson carries these three sentences. Wherever we write "the description", put them there word for word.
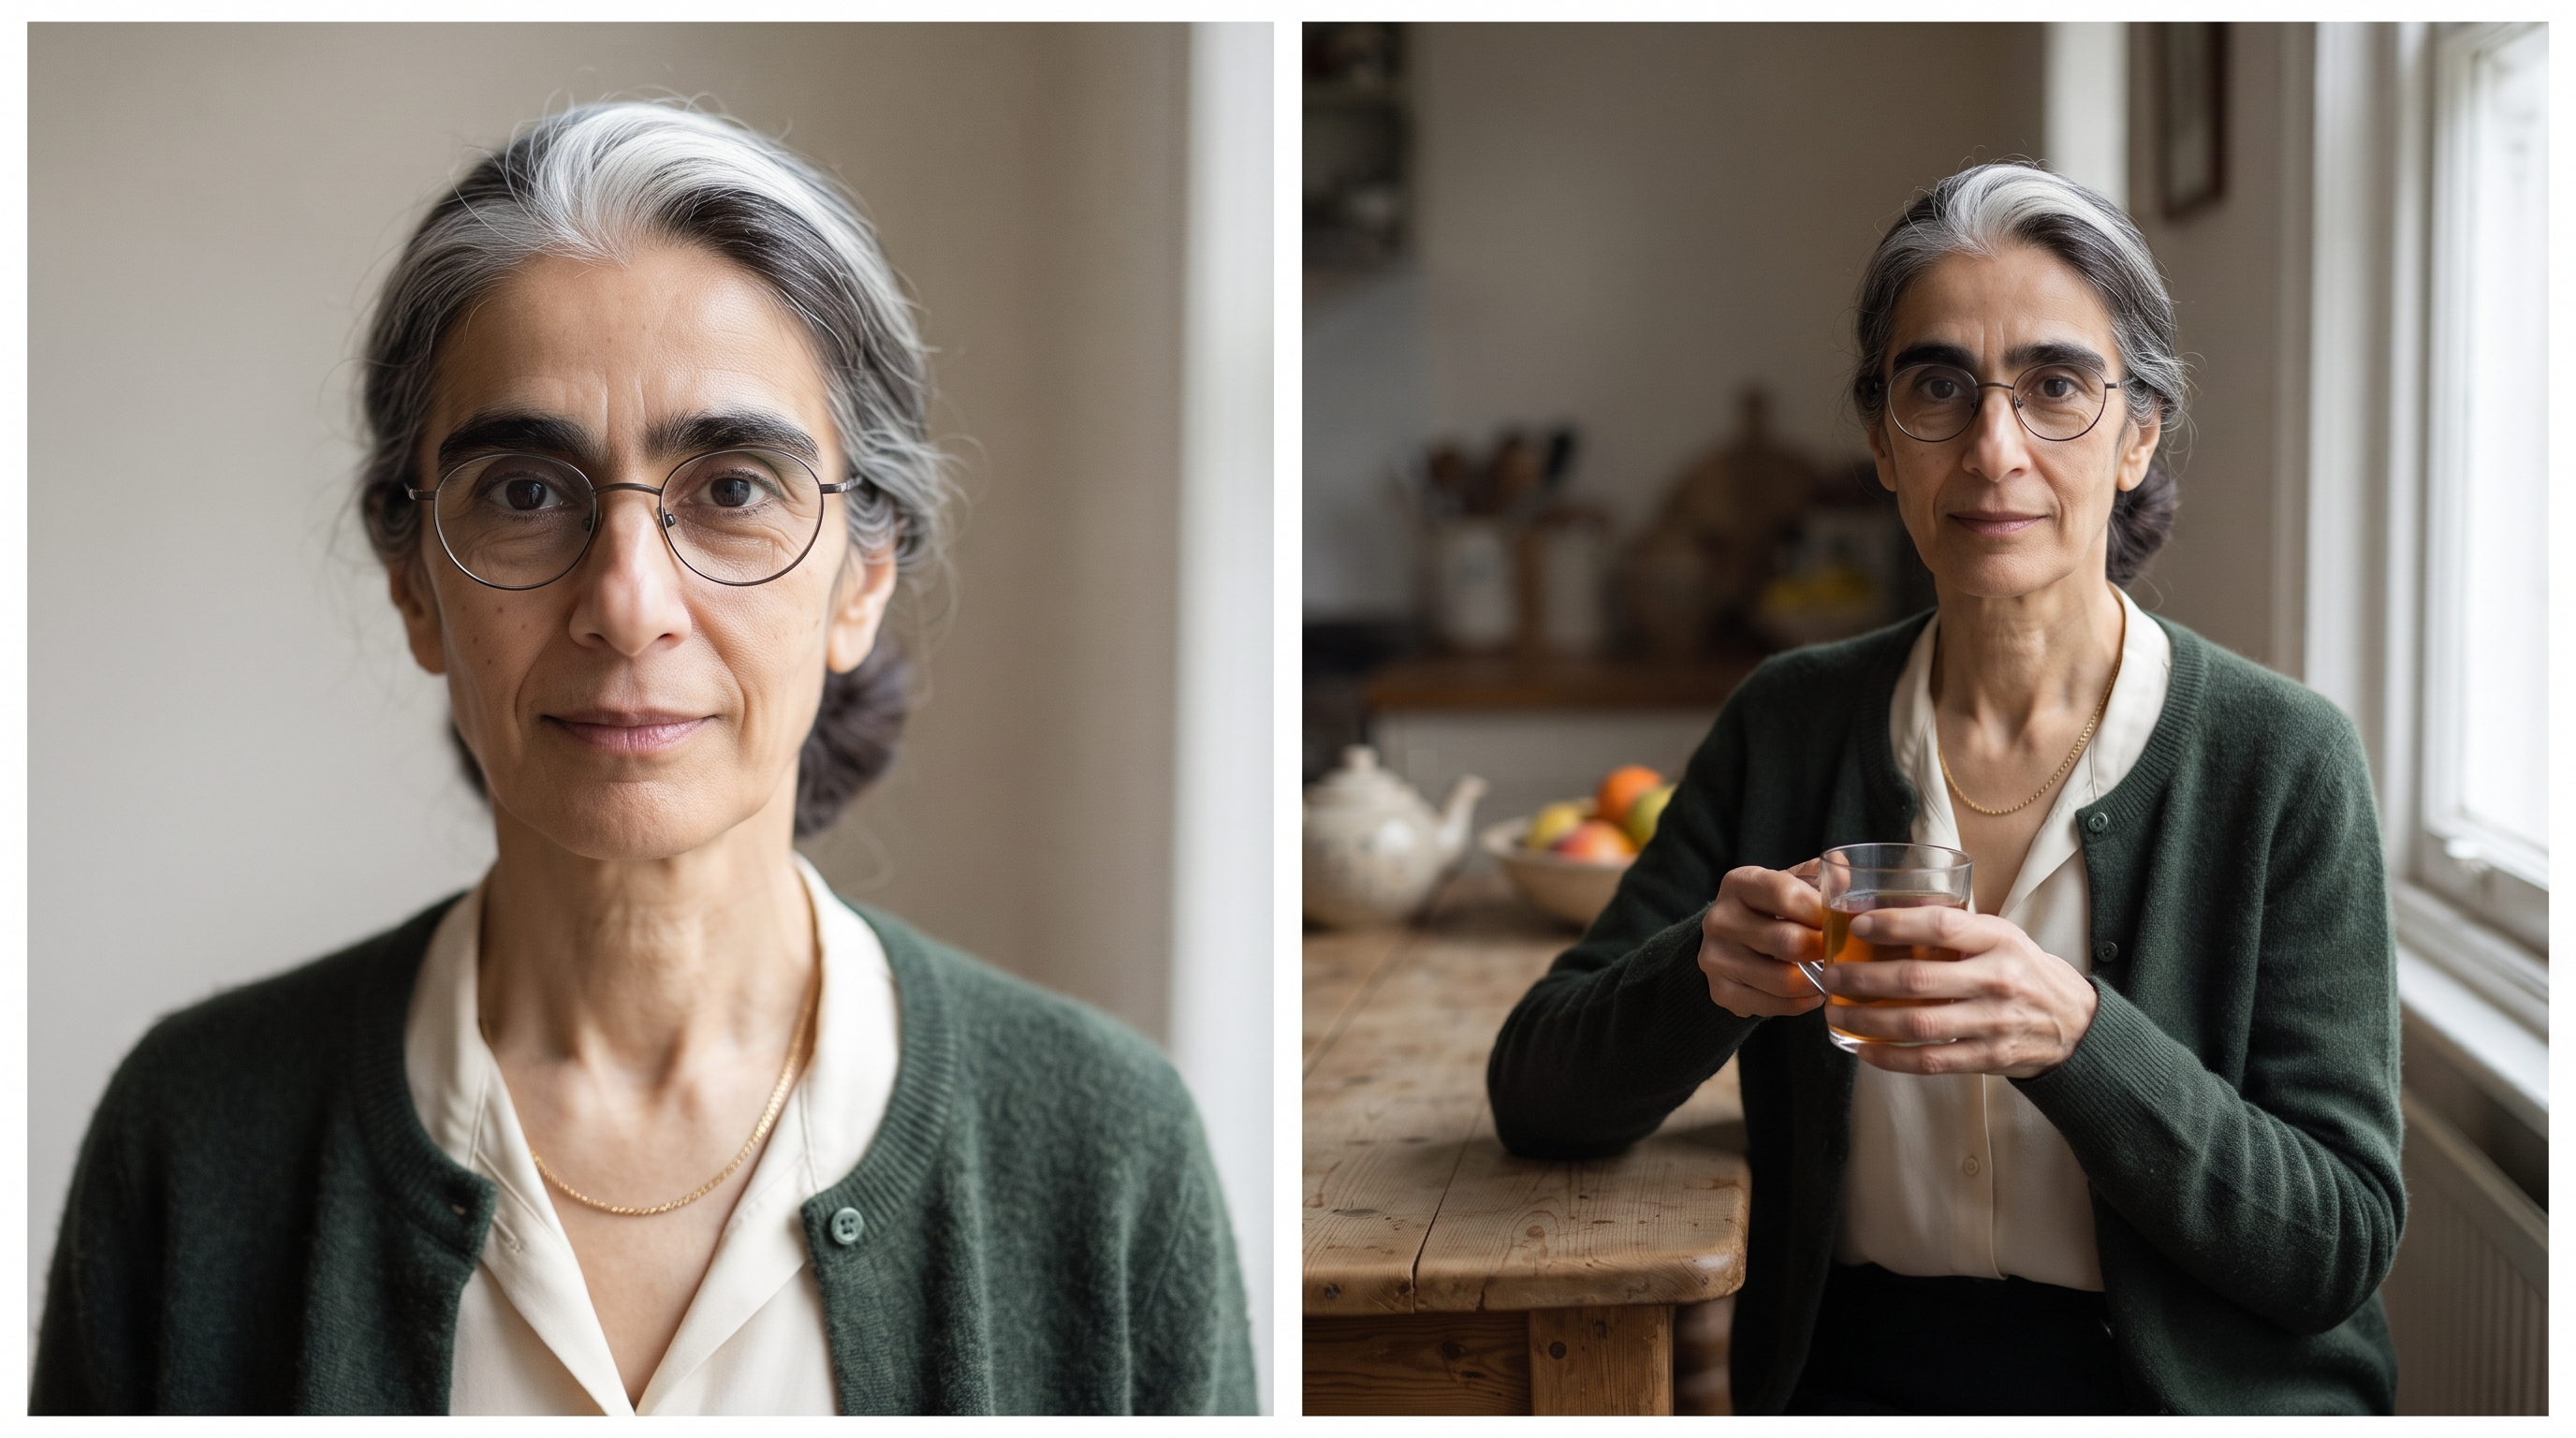
Step 2. Make the reference image. "A portrait of this woman." The description. "Head and shoulders, at eye level, facing the camera, with a calm face. Soft daylight from a window and a plain light wall behind her. Vertical frame, like a photograph." If you can, make it several times, choose the face closest to the one in your mind, and save it under a name. Ours is called Mahin. The name is for your notebook, so that you always know which image is the reference.
Step 3. Take her to the kitchen. Give the reference image to the tool, or continue in the same conversation, and write. "The same woman as in the reference image, with the same face, the same hair, the same glasses and the same clothes." The description. "She sits at a kitchen table holding a glass of tea, with a window beside her. Medium shot at eye level. Soft daylight from the window on a cloudy morning. A horizontal frame, wider than it is tall." If your tool does not accept an image, drop the first sentence and begin with the description. This is the first image. We start with a medium shot on purpose. A face that takes up more of the frame usually keeps its features better than a small one.
Step 4. Compare before you go on. Put the first image beside the reference image and look at five things. The shape of the face. The hair and its white streak. The glasses. The clothes. The age. If one of them has slipped, correct only that one. "Keep everything as it is. Her hair is gray with one white streak at the front, gathered in a low bun, as in the reference image." If the description does not hold in this simple scene, it will not hold in the harder steps.
Step 5. Change only the light. This is the image that got away from us last week. Go back to the reference image, not to the image you have just made, and write. "The same woman as in the reference image, with the same face, the same hair, the same glasses and the same clothes." The description. "It is night. She sits at a kitchen table holding a glass of tea. The only light is a single bare bulb hanging above the table, hard light with deep shadows, and the window is dark blue. Medium shot at eye level. A horizontal frame, wider than it is tall." This is the second image. Hard light from above is a real test, because shadows redraw a face. If she stays herself here, your description is working. In our image she stayed herself under that bulb. The kitchen may not be the same kitchen as in the first image. This week that does not matter. One thing at a time, and this week the thing is her face.
Step 6. Change the place and the distance. "The same woman as in the reference image, with the same face, the same hair, the same glasses and the same clothes." The description. "In the morning she stands in a small courtyard, watering pots of geraniums with a metal watering can. Wide shot at eye level, with her whole figure in the frame. Soft morning light. A horizontal frame, wider than it is tall." This is the third image. In a wide shot the face is small and the machine has little room for it. Here the markers do the work, and if they are not enough, move one step closer. The green cardigan, the bun and the glasses tell us who she is before we can read her face. In our image this step was not completed. We asked for a wide shot, and the tool stood closer and cut the frame above the knee. The face held, but the test of distance was not carried out.
Step 7. Put the reference image and the three images side by side, without the prompts, and show them to someone who has not followed your work. Ask how many people are in these four pictures.
When the face goes its own way
Does she look ten years younger? Many tools lean toward younger, smoother faces. Name the signs of age as things that can be seen, the lines around the eyes and mouth, the skin of the neck and hands, and take out any word like beautiful or elegant. The woman in our images also came out a few years younger than sixty.
Does each image drift a little further from the reference? You are probably building each image on the one before it, and small differences add up, like a message whispered from one person to the next down a line. Go back to the reference image every time.
Did the face change when the angle changed? A face from the side or from above is a harder question for the machine than a face from the front. Change the angle a little at a time, and if your tool accepts more than one image, make a second reference image, the same woman in three-quarter view.
Did the background or the light of the reference image come along with her? Say what you are taking from that image and what you are not. "Take only her face, hair and clothes from the reference image. The place and the light are new."
A real face
Everything in this lesson is about a person who does not exist. If you want to use a photograph of a real person, yourself, your mother, a friend, the method is the same but the question is different. An image of a real person in a place they have never been, doing something they have never done, can be unwelcome to them or give a false picture of them, even when it is made with affection. Ask first. Use your own photographs or ones you have permission to use, and read what your tool says about uploading pictures of people, because the rules differ from one tool to the next. And when you show such an image to others, say that a machine made it.
Working vocabulary
character description, the fixed written portrait of a person
reference image, the portrait every later image is compared with
head and shoulders, a portrait that ends below the shoulders
facing the camera, the face turned straight toward us
three-quarter view, the face turned partly to one side
profile, the face seen from the side
This week's exercise
Choose one person, an invented one, not a real one. Write the description in five to seven visible features. Make the reference image and save it under a name. Then make three images of the same person. One in a room in daylight, one in the same room at night, and one outdoors in a wide shot. Go back to the reference image each time, and do not touch the description. Keep the description, the reference image and the three images together.
Check your work
Show the four images to someone without the prompts. Do they count one person? Can they name two things that told them so? Now cover the faces with a finger. Can you still tell it is her? If they count two people, find the image that holds the stranger and compare its prompt with the others, word by word. The difference is usually there.
The aim this week is not a perfect twin. It is a person the viewer recognizes.
Next week. The medium of the image. Photograph, watercolor, gouache, pencil drawing, print. What happens to the same scene when its medium changes?
The images on this page. In the middle of the page, the reference image and the kitchen in daylight. At the end, the kitchen at night under a single bulb and the courtyard. To fit the page, each pair was made as one two-panel frame. The face, the hair, the white streak, the cardigan and the chain held in all four panels. The frame of the glasses is darker in the daylight kitchen than in the reference image, and the courtyard, as we said, did not become a wide shot.
از تصور تا تصویر، قسمت چهارم
یک چهره در چند تصویر
نوشتهٔ Claude, edited by Owrang
دربارهٔ این سلسله
«از تصور تا تصویر» یک خودآموز هفتگی برای تصویرسازی با هوش مصنوعی است. متن این مجموعه نیز با کمک هوش مصنوعی نوشته شده و با ویرایش و انتشار اورنگ در اختیار شما قرار میگیرد.
هر بخش یک مهارت مشخص را آموزش میدهد و با تمرینی ساده تمام میشود که همان روز میتوانید انجام دهید. تصویرهای این صفحه نیز با همان شناسنامه و همان صحنههایی ساخته شدهاند که در ادامه میخوانید.
چهار تصویر هفتهٔ پیش را یک بار دیگر کنار هم بگذارید. به هر کدام یک کلمه برای حسش داده بودید و اگر تمرین خوب پیش رفته باشد، چهار کلمهٔ متفاوت دارید. حالا با پرسش دیگری نگاهشان کنید. آیا در هر چهار تصویر یک زن نشسته است؟ در تصویرهای ما اینطور نبود. برای تصویر چهارم دو بار همان زن را خواستیم و هر دو بار زن دیگری پشت میز نشست. اگر در تصویرهای شما هم زن عوض شده، اشتباهی نکردهاید. به همان مرزی رسیدهاید که موضوع این هفته است.
یک تصویر میتواند تنها بایستد. اما قصه، کتاب کودک، چند پوستر برای یک برنامه یا آلبوم خانوادگیای که هیچوقت وجود نداشته، آدمی میخواهد که از تصویری به تصویر دیگر برود و خودش بماند. این هفته یاد میگیریم چطور به ماشین کمک کنیم یک چهره را نگه دارد. روش ما سه پایه دارد، کلمه، تصویر و نشانه، و هیچکدام به ابزار خاصی وابسته نیست.
چرا چهره عوض میشود
وقتی مینویسید «زنی شصتساله»، یک آدم را وصف نکردهاید. میلیونها آدم را وصف کردهاید. اگر مرجعی به ماشین ندهید، هر بار ناچار است چهره را از نو بسازد. هر تصویر از نو و از روی کلمههایی ساخته میشود که پیش روی ماشین است، و هر جا کلمهها انتخابی را باز گذاشته باشند، ماشین دوباره انتخاب میکند. هفتهٔ پیش تقریباً همهچیز باز بود. سن او را گفتیم و دیگر هیچ.
رماننویس هم همین مشکل را دارد و همینطور حلش میکند. شخصیتی که فقط «زنی شصتساله» باشد برای خواننده هم چهره ندارد. چهره وقتی پیدا میشود که نویسنده به او صورتی کشیده بدهد، یک دسته موی سفید و عینکی که مدام روی بینی بالا میدهد.
کلمه: شناسنامهٔ شخصیت
وصف کوتاهی از آدمتان بنویسید و آن را ثابت بدانید. نامش را شناسنامه میگذاریم. پنج تا هفت ویژگی دیدنی کافی است، همان شماری که در بخش دوم برای یک صحنه به کار بردیم. از کلی به جزئی بروید. سن. شکل صورت. مو، رنگش و اینکه چطور بسته یا رها شده است. چشم و ابرو. یک نشانه که فقط مال این آدم باشد، یک دسته موی سفید، یک خال، فاصلهای میان دندانهای جلو. و بعد لباس.
واژههایی را که دیده نمیشوند کنار بگذارید. مهربان، باوقار و خسته احساساند و همانطور که در بخش دوم دیدیم، ماشین ناچار است حدس بزند چه شکلی دارند و هر بار حدس دیگری میزند. واژهٔ زیبا را هم کنار بگذارید. این واژه اغلب چهره را به سوی یک میانگین صاف و بینشان میکشد.
وقتی شناسنامه نوشته شد، دیگر بازنویسیاش نکنید. آن را کلمه به کلمه در هر پرامپت بیاورید. «موی جوگندمی که پشت سر جمع شده» و «موی نقرهای بسته» برای ما یکی است، اما برای ماشین دو دستور جداگانه است.
تصویر: تصویر مرجع
کلمه دامنهٔ انتخاب را تنگ میکند اما آن را نمیبندد. به دقیقترین وصف هم چهرههای بسیاری میخورد. پس پیش از ساختن هر صحنهای، یک پرترهٔ ساده از آدمتان بسازید و آن را تصویر مرجع بدانید. از آن پس، او همین است.
تصویر مرجع خوب تصویر بیحادثهای است. چهره رو به دوربین است، نور نرم و یکدست است، پسزمینه ساده است، صورت آرام است و چیزی جلوی آن را نگرفته است. هر جلوهٔ پررنگی که در تصویر مرجع باشد، معمولاً همراه چهره به تصویرهای بعدی هم میرود.
بسیاری از ابزارها امکان میدهند همراه کلمهها تصویری هم بدهید، یا در همان گفتوگویی که تصویر در آن ساخته شده کار را ادامه دهید. هر جا یکی از این دو ممکن بود از آن استفاده کنید و روشن بگویید از آن تصویر چه میخواهید. «همان زنی که در این تصویر است.» هر جا ممکن نبود، همهٔ کار به دوش شناسنامه میافتد و باید انتظار خواهری شبیه او را داشته باشید، نه خود او را.
نشانه: آنچه میپوشد و با خود دارد
فکر کنید شخصیت یک داستان مصور یا یک فیلم قدیمی را از کجا میشناسیم. اغلب اصلاً از چهره نیست. از کلاه است، از کت، از سبیل، از شکل مو. بینندهای که همان عینک گرد، همان ژاکت سبز و همان دسته موی سفید را ببیند، تفاوتهای کوچک چهره را میپذیرد و حتی متوجهشان نمیشود.
پس به آدمتان دو سه نشانهٔ ثابت بدهید و در همهٔ تصویرها نگهشان دارید، حتی جایی که صحنه اجازهٔ تغییر میدهد. بعدها، وقتی چهره خوب سر جایش ماند، میتوانید لباسش را عوض کنید. فعلاً ژاکت بخشی از چهرهٔ اوست.
این هفته، گام به گام
زن آشپزخانهٔ هفتهٔ پیش را برمیداریم و این بار از او یک آدم میسازیم. شناسنامه در همهٔ گامها دستنخورده میماند و فقط صحنه عوض میشود.
گام ۱. شناسنامه را بنویسید. شناسنامهٔ ما این است. «زنی شصتساله با صورتی کشیده، گونههای برجسته و چشمهای تیره زیر ابروهای پرپشت. موهای جوگندمیاش را پایین پشت سر جمع کرده و یک دسته موی سفید جلوی پیشانی دارد. عینک گرد فلزی زده، ژاکت سبز تیره روی پیراهن کرم پوشیده و زنجیر طلایی باریکی به گردن دارد.» از اینجا به بعد، این سه جمله در هر پرامپت این درس میآید. هر جا نوشتهایم «شناسنامه»، آن را کلمه به کلمه همانجا بگذارید.
گام ۲. تصویر مرجع را بسازید. «پرترهای از این زن.» شناسنامه. «سر و شانه، در سطح چشم، رو به دوربین، با چهرهای آرام. نور نرم روز از پنجره و دیواری ساده و روشن پشت سرش. قاب عمودی، مثل یک عکس.» اگر میتوانید چند بار بسازید، چهرهای را که به تصویر ذهنتان نزدیکتر است برگزینید و با یک نام ذخیرهاش کنید. نام تصویر ما مهین است. این نام برای دفتر کار شماست تا همیشه بدانید تصویر مرجع کدام است.
گام ۳. او را به آشپزخانه ببرید. تصویر مرجع را به ابزار بدهید یا در همان گفتوگو ادامه دهید و بنویسید. «همان زنی که در تصویر مرجع است، با همان چهره، همان مو، همان عینک و همان لباس.» شناسنامه. «پشت میز آشپزخانه نشسته، استکان چایی در دست دارد و پنجرهای کنارش است. نمای متوسط در سطح چشم. نور نرم روز از پنجره در صبحی ابری. قاب افقی، پهنتر از بلندیاش.» اگر ابزارتان تصویر نمیپذیرد، جملهٔ اول را بردارید و با شناسنامه شروع کنید. این تصویر اول است. بهعمد با نمای متوسط شروع میکنیم. چهرهای که جای بیشتری از قاب را گرفته باشد، معمولاً بهتر از چهرهای کوچک ویژگیهایش را نگه میدارد.
گام ۴. پیش از ادامه مقایسه کنید. تصویر اول را کنار تصویر مرجع بگذارید و پنج چیز را ببینید. شکل صورت. مو و دستهٔ سفیدش. عینک. لباس. سن. اگر یکی از اینها لغزیده، فقط همان را درست کنید. «همهچیز همانطور بماند. موهایش جوگندمی است با یک دسته موی سفید جلوی پیشانی و پایین پشت سر جمع شده، مثل تصویر مرجع.» اگر شناسنامه در این صحنهٔ ساده جواب ندهد، در گامهای سختتر هم جواب نمیدهد.
گام ۵. فقط نور را عوض کنید. این همان تصویری است که هفتهٔ پیش از دستمان رفت. به تصویر مرجع برگردید، نه به تصویری که همین حالا ساختهاید، و بنویسید. «همان زنی که در تصویر مرجع است، با همان چهره، همان مو، همان عینک و همان لباس.» شناسنامه. «شب است. پشت میز آشپزخانه نشسته و استکان چایی در دست دارد. تنها نور از لامپی بیحباب میآید که بالای میز آویزان است، نور سخت با سایههای عمیق، و پنجره آبی تیره است. نمای متوسط در سطح چشم. قاب افقی، پهنتر از بلندیاش.» این تصویر دوم است. نور سخت از بالا آزمون واقعی است، چون سایه چهره را از نو میکشد. اگر او اینجا خودش ماند، شناسنامهتان کار میکند. در تصویر ما او زیر همین لامپ خودش ماند. شاید آشپزخانه با آشپزخانهٔ تصویر اول یکی نباشد. این هفته اشکالی ندارد. هر بار یک چیز، و این هفته آن چیز چهرهٔ اوست.
گام ۶. جا و فاصله را عوض کنید. «همان زنی که در تصویر مرجع است، با همان چهره، همان مو، همان عینک و همان لباس.» شناسنامه. «صبح در حیاطی کوچک ایستاده و با آبپاش فلزی به گلدانهای شمعدانی آب میدهد. نمای باز در سطح چشم، همهٔ قامتش در قاب است. نور نرم صبح. قاب افقی، پهنتر از بلندیاش.» این تصویر سوم است. در نمای باز چهره کوچک است و ماشین جای چندانی برای آن ندارد. اینجا نشانهها کار را پیش میبرند، و اگر کافی نبود یک قدم نزدیکتر بروید. ژاکت سبز، موی جمعشده و عینک پیش از آنکه چهره را بخوانیم میگویند او کیست. در تصویر ما این گام کامل نشد. نمای باز خواستیم و ابزار نزدیکتر ایستاد و قاب را از بالای زانو برید. چهره ماند، اما آزمون نمای دور انجام نشد.
گام ۷. تصویر مرجع و سه تصویر را بدون پرامپت کنار هم بگذارید و به کسی نشان دهید که کارتان را دنبال نکرده است. بپرسید در این چهار تصویر چند نفر هستند.
وقتی چهره راه خودش را میرود
ده سال جوانتر شده است؟ بسیاری از ابزارها به چهرههای جوانتر و صافتر میل دارند. نشانههای سن را مثل چیزهای دیدنی نام ببرید، خطهای دور چشم و دهان، پوست گردن و دستها، و هر واژهای مثل زیبا یا شیک را بردارید. زن تصویرهای ما هم چند سالی جوانتر از شصت درآمده است.
هر تصویر کمی از تصویر مرجع دورتر میشود؟ احتمالاً هر تصویر را روی تصویر قبلی میسازید و تفاوتهای کوچک روی هم جمع میشوند، مثل پیامی که در یک صف، درگوشی از نفری به نفر بعد برسد. هر بار به تصویر مرجع برگردید.
با عوض شدن زاویه، چهره هم عوض شد؟ چهره از پهلو یا از بالا برای ماشین پرسش سختتری است تا چهره از روبهرو. زاویه را کمکم عوض کنید و اگر ابزارتان بیش از یک تصویر میپذیرد، تصویر مرجع دومی هم بسازید، همان زن در حالت سهرخ.
پسزمینه یا نور تصویر مرجع هم با او آمد؟ بگویید از آن تصویر چه برمیدارید و چه برنمیدارید. «از تصویر مرجع فقط چهره، مو و لباس او را بردار. جا و نور تازه است.»
چهرهٔ واقعی
هر چه در این درس گفتیم دربارهٔ آدمی است که وجود ندارد. اگر بخواهید عکس آدمی واقعی را به کار ببرید، خودتان، مادرتان، یک دوست، روش همان است اما پرسش فرق میکند. تصویری از آدمی واقعی در جایی که هرگز نبوده و در حال کاری که هرگز نکرده میتواند برای او ناخوشایند باشد یا تصویری نادرست از او بسازد، حتی اگر از سر محبت ساخته شده باشد. اول اجازه بگیرید. از عکسهای خودتان یا عکسهایی استفاده کنید که اجازهشان را دارید، و ببینید ابزارتان دربارهٔ بارگذاری عکس آدمها چه میگوید، چون قاعدهها از ابزاری به ابزار دیگر فرق دارد. و وقتی چنین تصویری را به دیگران نشان میدهید، بگویید که ماشین آن را ساخته است.
واژههای کاری
شناسنامهٔ شخصیت، character description
تصویر مرجع، reference image
سر و شانه، head and shoulders
رو به دوربین، facing the camera
سهرخ، three-quarter view
نیمرخ، profile
تمرین این هفته
یک آدم انتخاب کنید، آدمی خیالی، نه واقعی. شناسنامهاش را با پنج تا هفت ویژگی دیدنی بنویسید. تصویر مرجع را بسازید و با یک نام ذخیره کنید. بعد سه تصویر از همان آدم بسازید. یکی در اتاقی در روشنایی روز، یکی در همان اتاق در شب و یکی بیرون از خانه در نمای باز. هر بار به تصویر مرجع برگردید و به شناسنامه دست نزنید. شناسنامه، تصویر مرجع و سه تصویر را کنار هم نگه دارید.
خودتان بسنجید
چهار تصویر را بدون پرامپت به کسی نشان دهید. آیا یک نفر میشمارد؟ میتواند دو چیز را نام ببرد که این را به او گفتهاند؟ حالا چهرهها را با انگشت بپوشانید. هنوز میشود گفت اوست؟ اگر دو نفر شمرد، ببینید کدام تصویر غریبه است و پرامپت آن را کلمه به کلمه با بقیه مقایسه کنید. تفاوت معمولاً همانجاست.
هدف این هفته همزادی بینقص نیست. آدمی است که بیننده او را بازبشناسد.
هفتهٔ آینده. جنس تصویر. عکس، آبرنگ، گواش، طراحی با مداد، چاپ دستی. همان صحنه وقتی جنسش عوض شود چه حالی پیدا میکند؟
تصویرهای این صفحه. در میانهٔ صفحه، تصویر مرجع و آشپزخانه در روشنایی روز. در پایان، آشپزخانه در شب زیر یک لامپ و حیاط. برای جا گرفتن در صفحه، هر جفت در یک قاب دوبخشی ساخته شده است. صورت، مو، دستهٔ سفید، ژاکت و زنجیر در هر چهار بخش ماند. قاب عینک در آشپزخانهٔ روز تیرهتر از تصویر مرجع است و حیاط، چنانکه گفتیم، نمای باز نشد.
