

From Idea to Image, Part Three
The Language of the Image
By Claude, edited by Owrang
About this series
From Idea to Image is a weekly self-study course in making images with AI. The text of the series is also written with the help of AI and is edited and published by Owrang.
Each part teaches one skill and ends with a simple exercise you can do the same day. The images at the end of this page were made with exactly the steps you will read below.
Look again at last week's third image. The bookseller, the tea glass and the shelves stayed the same. Only our place changed. We stepped out into the street, and the warm, quiet room became a lit window in a dark evening, a man seen from outside, almost alone. Nothing was added to the scene, yet the image told a different story.
That change is the subject of this week. Every image answers three questions before the viewer notices a single detail. How much of the world are we shown? Where are we standing? Where does the light come from? Painters, photographers and cinematographers have worked on these questions for centuries. Image models have learned from vast collections of pictures and the words that accompany them, each model in its own way, so the vocabulary of these crafts works in a prompt. When you use it, you are no longer asking for a nice picture. You are directing.
Frame
The frame decides what belongs to the image and what stays outside. Start with its shape. A horizontal frame lies down like a landscape and suits places, rooms and people in their surroundings. A vertical frame stands up like a person and suits portraits, doorways and phone screens. A square gathers everything toward the center. Most tools have a setting for the shape of the frame. Use it when it exists, because it is more reliable than words.
Then decide where the subject sits. In the middle it is calm and formal, like an icon. A third of the way in from one side, it leaves room for a view, a glance or a road. A small figure in a large empty frame feels lonely or free, depending on the light. The same figure filling the frame feels close, sometimes very close. Write this in the prompt in plain words. The woman sits at the left edge of the frame and the window fills the rest.
Distance and angle
Distance is how large the subject appears in the frame. Film crews name it by shots. A wide shot shows the whole place and the person inside it. A medium shot cuts at the waist and gives us gesture and posture. A close-up holds the face, and the viewer begins to read feelings. An extreme close-up shows only the eyes, a hand or a cup, and turns a detail into an event. Each step closer asks the viewer to feel more and to know less about where we are.
Angle is the height of the camera. At eye level we meet the person as an equal. A low angle, the camera below and looking up, makes the subject taller and stronger, sometimes threatening, and puts sky or ceiling behind them. A high angle, the camera above and looking down, makes them smaller and more exposed. Overhead is the extreme case, the camera almost straight down, and the world turns into a pattern, a table, a courtyard, a crowd seen like a map. A tilted camera, which cinema calls a Dutch angle, makes the ground feel unsteady. Use it rarely, because it is loud.
You can also name a lens. A wide-angle lens close to the subject stretches the space, making rooms deeper and noses larger. A long lens, a telephoto, narrows the view and makes distances look shorter, so the background seems to stand close behind the subject. A soft, blurred background is a related but separate matter. It comes from shallow depth of field, and a long lens, a wide aperture and a background far behind the subject all help to create it. Write shallow depth of field when you want the subject sharp and the background soft. The machine does not calculate optics. It imitates the look of photographs taken this way, and that is usually enough.
Light
Light carries the mood more than any other element. In Part Two we asked where the light comes from. Now we give it direction, quality and color.
Direction. Light from the front, from behind the camera, usually builds less volume and shadow, and the result looks more direct and flatter. Light from the side divides the face into a lit half and a shadowed half and gives it weight and drama. Seventeenth-century painters loved it, and photographers still name one careful arrangement of it after Rembrandt. Its sign is a small triangle of light under the eye on the shadowed cheek. Light from behind the subject draws a bright edge around the hair and shoulders, and when it is strong enough it turns the person into a silhouette, a dark shape against brightness. Light from below feels strange and theatrical, because nature almost never provides it.
Quality. Hard light comes from a small, strong source, the noon sun or a bare bulb, and draws sharp shadows. Soft light comes from a large source, an overcast sky or a big window, and wraps gently around forms. Say which one you want. Otherwise the machine often chooses a smooth, even glow that belongs to no real place.
Color and time. A household lamp is warm and orange, and daylight in shade is cool and blue. The short time after sunrise and before sunset, which photographers call the golden hour, gives low warm light and long shadows. Its length depends on the season and on where you are. The brief time after sunset, the blue hour, gives a deep blue sky while windows and streetlights are still warm. Putting warm and cool light in the same frame is one of the simplest ways to bring an image to life.
One more habit. Whenever you can, name a single main light source. A prompt that mentions a window, a lamp, candles and neon all at once often gets a picture lit from everywhere and from nowhere.
This week, step by step
We use one subject for the whole exercise, so that every difference you see comes from the language of the image and not from the content. Change only one thing at each step. If you change several things at once, you can no longer tell which change made the result.
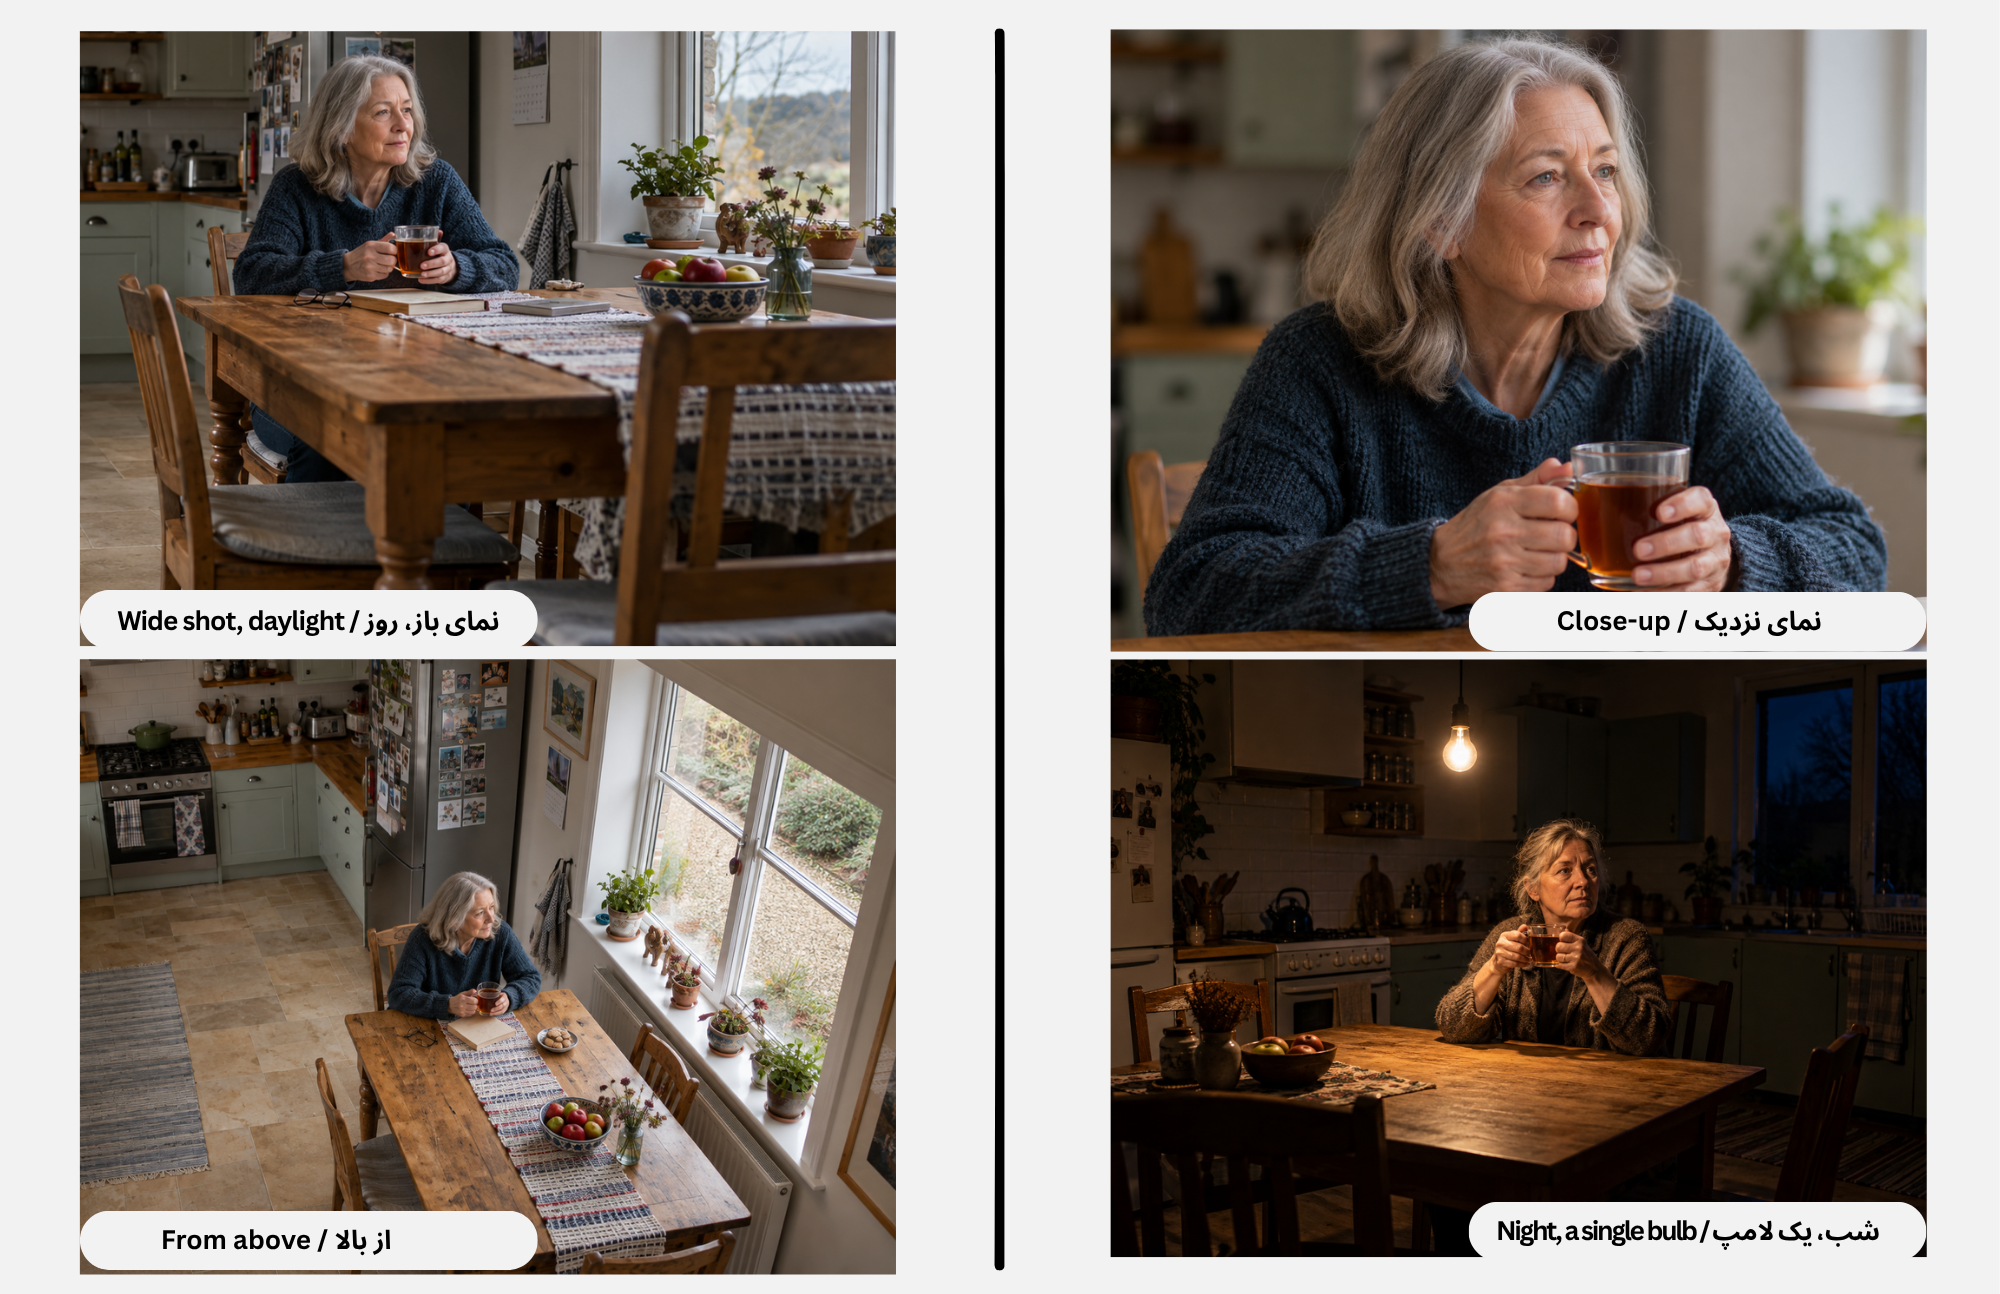
Step 1. Write the base sentence and keep it unchanged in every version. Ours is this. A woman in her sixties sits at a kitchen table holding a glass of tea, with a window beside her.
Step 2. First version. Add frame, distance, angle and light. A horizontal wide shot at eye level. Soft daylight from the window on a cloudy morning, the whole kitchen visible. Make the image. This is the first image.
Step 3. Change only the distance. A close-up of her face and both hands holding the glass, with the same light and the same angle. The window stays in the background. Make the image. This is the second image. The kitchen disappears and the tea glass becomes important. You will also see the background soften on its own. In a close-up this is usual, and it shows that distance and depth of field often travel together.
Step 4. Go back to the wide shot and change only the angle. A high angle, the camera near the ceiling, looking down at the table. Make the image. This is the third image. She now looks smaller, and the room around her says more.
Step 5. Go back to the first version and change only the light. Night. The only light is a single bare bulb hanging above the table, hard light with deep shadows, and the window is dark blue. Make the image. This is the fourth image.
Step 6. Put the four images side by side and give each one a single word for its feeling. If two of your words are the same, the change between those two versions was too small. Make it bolder and try again.
When the image goes its own way
Did the camera stay at eye level? Write the camera's position as a place, the camera on the floor, looking up. This is usually clearer than the words low angle alone, and it works best at the start of the prompt.
Did the woman change when the light changed? Say what stays. The same woman, the same clothes, the same kitchen. Some tools also let you continue from the previous image instead of starting again. Use that. Even so, holding a face is still the hardest thing to ask of the machine. Look at the fourth image at the end of this page. We asked twice for the same woman, and twice a different woman sat down at the table. Keeping one face across many images is a skill of its own, and it is the subject of next week.
Did the shape of the frame change from image to image? The machine often picks a new shape for each image unless it is told otherwise. Set the shape in the tool's settings before you begin, and repeat it in every prompt, a horizontal frame, wider than it is tall. In our own exercise the shape changed with almost every image, and we trimmed the four images to one size for this page.
Did everything come out soft and golden? Some tools lean toward that look when no light is named. Name the light, name the hour, and ask for hard shadows if you want them.
Did the close-up cut off the hands? Say what must be inside the frame. Her face and both hands holding the glass are in the frame.
Did the word cinematic change nothing? The machine has no clear picture for it. Describe what makes a film frame instead, the shape of the frame, the lens, the direction of the light.
Working vocabulary
wide shot, the whole place with the person in it
medium shot, from the waist up
close-up, the face
extreme close-up, a single detail
eye level, the camera at the height of the eyes
low angle, the camera below, looking up
high angle, the camera above, looking down
overhead, the camera almost straight down
Dutch angle, a tilted camera
wide-angle lens, stretches space
telephoto lens, narrows the view and shortens distances
shallow depth of field, sharp subject, soft background
side light, light from one side
Rembrandt lighting, a triangle of light on the shadowed cheek
backlight, light from behind the subject
silhouette, a dark shape against brightness
hard light, sharp shadows
soft light, gentle shadows
golden hour, warm low light near sunrise or sunset
blue hour, deep blue sky just after sunset
negative space, the empty part of the frame
Check your work
Cover the prompts and look only at the four images. Can someone else tell which one was made with the word close-up, which one from a high angle, and which one at night? If they can, the language of the image is working.
Next week. One face in many images. How to keep a person the same from one image to the next.
At the end, the four images of the steps above, in order. Wide shot in daylight, close-up, high angle, night under a single bulb.
از تصور تا تصویر، قسمت سوم
زبان تصویر
نوشتهٔ Claude, edited by Owrang
دربارهٔ این سلسله
«از تصور تا تصویر» یک خودآموز هفتگی برای تصویرسازی با هوش مصنوعی است. متن این مجموعه نیز با کمک هوش مصنوعی نوشته شده و با ویرایش و انتشار اورنگ در اختیار شما قرار میگیرد.
هر بخش یک مهارت مشخص را آموزش میدهد و با تمرینی ساده تمام میشود که همان روز میتوانید انجام دهید. تصویرهای پایان این صفحه نیز دقیقاً با همان گامهایی ساخته شدهاند که در ادامه میخوانید.
سومین تصویر هفتهٔ پیش را دوباره نگاه کنید. کتابفروش، استکان چای و قفسهها همان بودند. فقط جای ما عوض شد. به خیابان رفتیم و آن اتاق گرم و آرام شد پنجرهای روشن در غروبی تاریک، مردی که از بیرون دیده میشود و انگار تنهاست. چیزی به صحنه اضافه نشد و تصویر قصهٔ دیگری گفت.
موضوع این هفته همین تغییر است. هر تصویر پیش از آنکه بیننده حتی یک جزء را ببیند به سه پرسش جواب داده است. چه اندازه از جهان را میبینیم؟ کجا ایستادهایم؟ نور از کجا میآید؟ نقاشان و عکاسان و فیلمبرداران قرنها روی این پرسشها کار کردهاند. مدلهای تصویرساز از مجموعههای بزرگی از تصویرها و کلمههایی که همراهشان آمده آموختهاند، هر مدل به شیوهٔ خودش، و به همین دلیل زبان این هنرها در پرامپت کار میکند. وقتی این زبان را به کار میبرید، دیگر یک تصویر قشنگ نمیخواهید. کارگردانی میکنید.
قاب
قاب تعیین میکند چه چیزی در تصویر هست و چه چیزی بیرون میماند. از شکلش شروع کنید. قاب افقی مثل منظره دراز کشیده و برای مکانها، اتاقها و آدمها در محیطشان مناسب است. قاب عمودی مثل آدم ایستاده و برای چهره، درگاه و صفحهٔ گوشی مناسب است. قاب مربع همهچیز را به سوی مرکز جمع میکند. بیشتر ابزارها برای شکل قاب تنظیمی دارند. اگر هست از همان استفاده کنید، چون از کلمه مطمئنتر است.
بعد تصمیم بگیرید سوژه کجا بنشیند. در وسط قاب آرام و رسمی است، مثل یک شمایل. اگر یکسوم از یکی از لبهها فاصله داشته باشد، برای منظرهای، نگاهی یا جادهای جا باز میکند. پیکری کوچک در قابی بزرگ و خالی، بسته به نور، تنها یا رها به نظر میرسد. همان پیکر اگر قاب را پر کند نزدیک است، گاهی خیلی نزدیک. این را با کلمههای ساده در پرامپت بنویسید. زن در لبهٔ چپ قاب نشسته و پنجره باقی قاب را پر کرده است.
فاصله و زاویه
فاصله یعنی سوژه در قاب چقدر بزرگ دیده میشود. سینماگران آن را با نام نماها میشناسند. نمای باز همهٔ مکان و آدمی را که در آن است نشان میدهد. نمای متوسط از کمر میبُرد و حرکت دست و حالت بدن را به ما میدهد. نمای نزدیک چهره را نگه میدارد و بیننده شروع میکند به خواندن احساس. نمای خیلی نزدیک فقط چشمها، یک دست یا یک فنجان را نشان میدهد و یک جزء را به رویداد تبدیل میکند. هر قدم نزدیکتر از بیننده میخواهد بیشتر حس کند و کمتر بداند کجاییم.
زاویه یعنی ارتفاع دوربین. در سطح چشم با آدم همتراز روبهرو میشویم. زاویهٔ پایین، یعنی دوربین پایین و رو به بالا، سوژه را بلندتر و نیرومندتر نشان میدهد، گاهی ترسناک، و آسمان یا سقف را پشتش میگذارد. زاویهٔ بالا، یعنی دوربین بالا و رو به پایین، او را کوچکتر و آسیبپذیرتر نشان میدهد. نمای از بالای سر حالت نهایی زاویهٔ بالاست، دوربین تقریباً عمود رو به پایین، و جهان به نقش بدل میشود، یک میز، یک حیاط، جمعیتی که مثل نقشه دیده میشود. دوربین کج، که سینما آن را زاویهٔ هلندی مینامد، زمین را ناآرام نشان میدهد. کم به کارش ببرید، چون صدایش بلند است.
میتوانید عدسی را هم نام ببرید. عدسی واید نزدیک سوژه فضا را کش میدهد، اتاق را عمیقتر و بینی را بزرگتر میکند. عدسی بلند یا تله زاویهٔ دید را تنگتر میکند و فاصلهها را کوتاهتر نشان میدهد، طوری که پسزمینه انگار درست پشت سوژه ایستاده است. پسزمینهٔ نرم و محو موضوعی مربوط ولی جداست. این حالت از عمق میدان کم میآید و عدسی بلند، دیافراگم باز و فاصلهٔ زیاد پسزمینه از سوژه همه به ساختنش کمک میکنند. هر وقت خواستید سوژه تیز باشد و پسزمینه نرم، بنویسید عمق میدان کم، یا به انگلیسی shallow depth of field. ماشین اپتیک را حساب نمیکند. ظاهر عکسهایی را تقلید میکند که اینطور گرفته شدهاند، و معمولاً همین کافی است.
نور
نور بیش از هر عنصر دیگری حال و هوا را میسازد. در بخش دوم پرسیدیم نور از کجا میآید. حالا به آن جهت و کیفیت و رنگ میدهیم.
جهت. نور از روبهرو، از پشت دوربین، معمولاً حجم و سایهٔ کمتری میسازد و نتیجه مستقیمتر و تختتر دیده میشود. نور از پهلو چهره را به نیمهای روشن و نیمهای در سایه تقسیم میکند و به آن وزن و هیجان میدهد. نقاشان قرن هفدهم دوستش داشتند و عکاسان هنوز یکی از آرایشهای دقیق آن را به نام رامبراند میشناسند. نشانهاش مثلث کوچکی از نور زیر چشم، روی گونهٔ سمت سایه است. نور از پشت سوژه لبهای روشن دور مو و شانهها میکشد و اگر به اندازهٔ کافی قوی باشد آدم را به ضدنور تبدیل میکند، شکلی تیره بر زمینهای روشن. نور از پایین غریب و نمایشی است، چون طبیعت تقریباً هیچوقت آن را نمیسازد.
کیفیت. نور سخت از منبعی کوچک و قوی میآید، آفتاب ظهر یا لامپ بیحباب، و سایههای تیز میکشد. نور نرم از منبعی بزرگ میآید، آسمان ابری یا پنجرهای بزرگ، و آرام دور شکلها میپیچد. بگویید کدام را میخواهید. وگرنه ماشین اغلب درخششی صاف و یکدست انتخاب میکند که به هیچ جای واقعی تعلق ندارد.
رنگ و ساعت. چراغ خانه گرم و نارنجی است و روشنایی روز در سایه سرد و آبی. زمان کوتاهی پس از طلوع و پیش از غروب، که عکاسان ساعت طلایی مینامندش، نوری گرم و مایل و سایههایی بلند میدهد. طول این زمان به فصل و جایی که هستید بستگی دارد. لحظههای کوتاه پس از غروب، ساعت آبی، آسمانی آبی و عمیق میدهد در حالی که پنجرهها و چراغهای خیابان هنوز گرماند. گذاشتن نور گرم و سرد کنار هم در یک قاب یکی از سادهترین راههای جان دادن به تصویر است.
یک عادت دیگر. هر وقت میتوانید، یک منبع اصلی نور را نام ببرید. پرامپتی که یکجا از پنجره و چراغ و شمع و نئون حرف میزند اغلب تصویری میگیرد که از همهجا روشن شده و از هیچجا.
این هفته، گام به گام
در همهٔ تمرین یک سوژه را به کار میبریم تا هر تفاوتی که میبینید از زبان تصویر بیاید، نه از محتوا. در هر گام فقط یک چیز را عوض کنید. اگر چند چیز را با هم عوض کنید، دیگر نمیدانید کدام تغییر نتیجه را ساخته است.
گام ۱. جملهٔ پایه را بنویسید و در همهٔ نسخهها دستنخورده نگهش دارید. جملهٔ ما این است. زنی شصتساله پشت میز آشپزخانه نشسته، استکان چایی در دست دارد و پنجرهای کنارش است.
گام ۲. نسخهٔ اول. قاب، فاصله، زاویه و نور را اضافه کنید. نمای باز افقی در سطح چشم. نور نرم روز از پنجره در صبحی ابری، همهٔ آشپزخانه پیداست. تصویر را بسازید. این تصویر اول است.
گام ۳. فقط فاصله را عوض کنید. نمای نزدیک از چهره و هر دو دست که استکان را گرفتهاند، با همان نور و همان زاویه. پنجره در پسزمینه میماند. تصویر را بسازید. این تصویر دوم است. آشپزخانه ناپدید میشود و استکان چای مهم میشود. میبینید که پسزمینه هم خودبهخود نرمتر شده است. در نمای نزدیک این معمول است و نشان میدهد فاصله و عمق میدان اغلب با هم تغییر میکنند.
گام ۴. به نمای باز برگردید و فقط زاویه را عوض کنید. زاویهٔ بالا، دوربین نزدیک سقف و رو به پایین به میز. تصویر را بسازید. این تصویر سوم است. زن حالا کوچکتر است و اتاق دورش بیشتر حرف میزند.
گام ۵. به نسخهٔ اول برگردید و فقط نور را عوض کنید. شب است. تنها نور از لامپی بیحباب میآید که بالای میز آویزان است، نور سخت با سایههای عمیق، و پنجره آبی تیره است. تصویر را بسازید. این تصویر چهارم است.
گام ۶. چهار تصویر را کنار هم بگذارید و به هر کدام یک کلمه برای حسش بدهید. اگر دو کلمه یکی شد، تغییر میان آن دو نسخه کوچک بوده است. جسورترش کنید و دوباره بسازید.
وقتی تصویر راه خودش را میرود
دوربین در سطح چشم ماند؟ جای دوربین را مثل یک مکان بنویسید، دوربین روی زمین، رو به بالا. این معمولاً از نوشتن فقط زاویهٔ پایین روشنتر است و در آغاز پرامپت بهتر جواب میدهد.
با عوض شدن نور، زن هم عوض شد؟ بگویید چه چیزی بماند. همان زن، همان لباس، همان آشپزخانه. بعضی ابزارها امکان میدهند از تصویر قبلی ادامه دهید و از نو شروع نکنید. از این امکان استفاده کنید. با این همه، نگه داشتن یک چهره هنوز سختترین خواستهٔ ما از ماشین است. به تصویر چهارم در پایان این صفحه نگاه کنید. دو بار همان زن را خواستیم و هر دو بار زن دیگری پشت میز نشست. یکسان نگه داشتن یک چهره در چند تصویر مهارتی جداگانه است و موضوع هفتهٔ آینده.
شکل قاب از تصویری به تصویر دیگر عوض شد؟ ماشین اگر به او گفته نشود، اغلب برای هر تصویر شکل تازهای انتخاب میکند. پیش از شروع، شکل قاب را در تنظیمات ابزار تعیین کنید و در هر پرامپت هم تکرارش کنید، قاب افقی، پهنتر از بلندیاش. در تمرین خود ما شکل قاب تقریباً با هر تصویر عوض شد و چهار تصویر را برای این صفحه به یک اندازه برش دادیم.
همهچیز نرم و طلایی درآمد؟ بعضی ابزارها وقتی نوری نام برده نشود به همین سو میروند. نور را نام ببرید، ساعت را نام ببرید و اگر سایهٔ تیز میخواهید بنویسید.
نمای نزدیک دستها را برید؟ بگویید چه چیزی باید درون قاب باشد. چهره و هر دو دست که استکان را گرفتهاند در قاباند.
کلمهٔ سینمایی چیزی را عوض نکرد؟ ماشین برای این کلمه تصویر روشنی ندارد. به جایش آنچه را یک قاب سینمایی را میسازد توصیف کنید، شکل قاب، عدسی، جهت نور.
واژههای کاری
نمای باز، wide shot
نمای متوسط، medium shot
نمای نزدیک، close-up
نمای خیلی نزدیک، extreme close-up
سطح چشم، eye level
زاویهٔ پایین، low angle
زاویهٔ بالا، high angle
از بالای سر، overhead
زاویهٔ هلندی، Dutch angle
عدسی واید، wide-angle lens
عدسی تله، telephoto lens
عمق میدان کم، shallow depth of field
نور از پهلو، side light
نور رامبراند، Rembrandt lighting
نور از پشت، backlight
ضدنور، silhouette
نور سخت، hard light
نور نرم، soft light
ساعت طلایی، golden hour
ساعت آبی، blue hour
فضای خالی، negative space
خودتان بسنجید
پرامپتها را بپوشانید و فقط به چهار تصویر نگاه کنید. آیا کس دیگری میتواند بگوید کدام با کلمهٔ نمای نزدیک ساخته شده، کدام با زاویهٔ بالا و کدام در شب؟ اگر میتواند، زبان تصویر کار میکند.
هفتهٔ آینده. یک چهره در چند تصویر. چطور یک آدم را از تصویری به تصویر دیگر یکسان نگه داریم.
در پایان، چهار تصویر گامهای بالا به ترتیب. نمای باز در روشنایی روز، نمای نزدیک، زاویهٔ بالا، شب زیر یک لامپ.